23 Studio Apartment Ideas That Actually Work in Real Life
The Studio Struggle Is Real
Let’s be honest: most “studio apartment ideas” you find online are a lie. The studios featured in those articles are 800 square feet with 12-foot ceilings, Restoration Hardware furniture, and natural light that apparently comes from God himself. You, meanwhile, are staring at 380 square feet, one sad window facing a brick wall, and a kitchen that is technically also your living room, office, and occasionally your gym.
This list is different. These are 23 ideas that work in actual small apartments — the kind where your bed is six feet from your stove and your “dining area” is a hopeful fiction. Most of these cost under $100 to implement. None of them require you to own the place. All of them will make a measurable difference. Let’s get into it.
The 23 Ideas
1. Use a Room Divider to Create a “Bedroom Zone”
Before: your studio feels like one big messy room where you eat, sleep, and spiral about your inbox simultaneously. After: it feels like a one-bedroom. A room divider — whether a bookshelf, a curtain panel on a ceiling track, or a folding screen — creates a visual boundary that tricks your brain into experiencing separate spaces. Aim for a divider that’s at least 65 inches tall to feel intentional rather than decorative. An open-back bookshelf works especially well because it divides without completely closing off light.
Try this: IKEA KALLAX 4×2 bookshelf used as a divider, ~$130, IKEA
✗ Don’t: use a folding screen that’s under 5 feet tall — it reads as furniture, not architecture.
2. Raise Your Curtains to Ceiling Height
This is a non-negotiable. Hanging curtains at window height (where the frame ends) makes your ceilings feel low and your windows feel small. Hanging them 4–6 inches below the ceiling and letting them pool slightly on the floor makes the same window look twice as grand. The curtain rod should extend at least 8 inches beyond each side of the window frame so the panels hang on the wall, not over the glass, maximizing your light when they’re open.
Try this: Linen-look curtain panels from Amazon Basics or H&M Home, ~$30–$50 per pair
✗ Don’t: buy curtains in a bold print — in a small space, they’ll visually eat the room alive.
3. Choose a Sofa With Legs (Not a Platform Sofa)
A sofa that sits directly on the floor creates a visual “wall” of mass. A sofa with legs — even 4-inch legs — lets light and sightlines pass underneath, which makes the room feel airier and bigger. As a bonus, you can store flat items underneath. Keep your sofa under 84 inches long; anything longer will block traffic flow in a room under 12 feet wide and make the whole space feel like a furniture showroom.
Try this: Article Soma sofa or IKEA LANDSKRONA, both have visible legs, ~$599–$799
✗ Don’t: push the sofa flat against the wall — it’s a common instinct but it actually makes rooms feel smaller.
4. Use One Large Rug Instead of Multiple Small Ones
Multiple small rugs in a studio chop the visual space into confusing little islands. One large rug — ideally 8×10 feet or bigger — anchors all your furniture and makes the whole area read as intentional. The front legs of your sofa and chairs should sit on the rug. If your rug is too small to do that, size up. A rug that floats in the middle of the room surrounded by bare floor is doing more harm than good.
Try this: Ruggable washable rugs, 8×10 starting at ~$219
✗ Don’t: go smaller than 6×9 in any living area — it will look like a bath mat escaped to the wrong room.
5. Get a Storage Ottoman Instead of a Coffee Table
A solid wood coffee table is a commitment. A storage ottoman does everything a coffee table does — holds your drink, your feet, your remotes — and also swallows your throw blankets, board games, and the decorative items you’re embarrassed about owning. Bonus: it’s softer, lighter, and easier to move when you need to rearrange. Add a tray on top to create a stable surface for drinks and it functions exactly like a table.
Try this: SONGMICS large storage ottoman, ~$60–$80, Amazon
✗ Don’t: get a round ottoman without a tray — your coffee will end up on the floor within a week.
6. Mount Your TV on the Wall to Free Up Floor Space
A TV stand takes up floor square footage you do not have to spare. Wall-mounting your TV (yes, even as a renter — use the right drywall anchors or a freestanding TV mount that doesn’t touch the wall) gives you back that floor space and forces you to clear the visual clutter that tends to collect on entertainment consoles. Mount the center of the screen at seated eye level — about 42 inches from the floor.
Try this: Mounting Dream full-motion TV wall mount, ~$35–$50, Amazon
✗ Don’t: mount it above the fireplace mantel — that’s too high for your neck and your viewing experience.
7. Use Vertical Space — Floor-to-Ceiling Shelving
The square footage you’re missing is above your head. Most people in small apartments use maybe the bottom 5 feet of vertical space and leave the top 3–4 feet completely empty. Floor-to-ceiling shelving — whether built-in-looking IKEA hacks or tension-mounted units — draws the eye up and gives you serious storage and display space without touching your floor plan. Style the upper shelves with lighter, less frequently used items and keep the heavier visual weight toward the bottom.
Try this: IKEA BILLY bookcases with height extension units, ~$80–$150 per column
✗ Don’t: cram every shelf full — leave 20–30% of shelf space open or it reads as clutter, not storage.
8. Choose Furniture in the Same Color Family as Your Walls
This is one of those counterintuitive ideas that sounds wrong until you see it. When your furniture blends with your walls — cream sofa against warm white walls, tan bookshelf against greige walls — the room feels expansive because the eye doesn’t stop at every piece. Contrast draws attention to how many separate objects are crammed into the space. Tonal decorating hides the seams. Save contrast for one or two deliberate accent pieces.
Try this: Clare paint in “Creme de la Creme” or “Polar” — pairs with almost any neutral furniture, ~$55/gallon
✗ Don’t: paint your walls dark AND buy dark furniture — without sufficient light, this creates a cave.
9. Use Mirrors Strategically (Not Just Randomly)
A mirror does nothing for your space if it’s reflecting a blank wall or the back of your door. Hang a mirror so it reflects a window or light source — that’s how you actually double your perceived light and space. One large mirror (at least 24×36 inches) is more effective than a collection of small decorative mirrors. Lean it against the wall for a casual, renter-friendly look that also avoids permanent installation.
Try this: Neutype large arched floor mirror, ~$80–$120, Amazon or Wayfair
✗ Don’t: hang a mirror directly opposite your bed — it sounds feng shui, but most people just find it unsettling.
10. Replace the Overhead Light With Layered Lighting
The overhead light in your rental is doing you dirty. One harsh overhead fixture flattens the room and highlights every flaw. Layered lighting — a floor lamp in one corner, a table lamp on a shelf, maybe LED strips behind your TV — creates depth, warmth, and zones. It also makes your studio feel curated instead of temporary. You don’t have to touch any wiring; plug-in sconces and smart bulbs do the heavy lifting.
Try this: LEPOWER clip or arc floor lamp, ~$40–$65, Amazon
✗ Don’t: rely solely on warm Edison bulbs — they look great but can make the space too dim to actually function in.
11. Add a Rolling Kitchen Cart for Extra Counter Space
Most studio kitchens have roughly 18 inches of usable counter space, which is not enough to make toast let alone cook an actual meal. A rolling kitchen cart gives you a portable prep station you can tuck away when not in use. Look for one with a butcher block top, lower shelves for storage, and locking wheels so it doesn’t wander while you’re chopping.
Try this: VEVOR or Seville Classics rolling kitchen island, ~$90–$130, Amazon
✗ Don’t: buy a cart wider than 24 inches if your kitchen walkway is under 42 inches — you’ll be shuffling sideways forever.
12. Use Command Strips for a Gallery Wall
Renters avoid gallery walls because they picture patching 47 holes when they move out. Command strips (specifically the picture-hanging strips, not the hooks) hold up to 16 lbs per pair and come off cleanly. A gallery wall above the sofa or bed immediately makes a studio feel designed and personal rather than just furnished. Map your layout on paper first, then use painter’s tape on the actual wall to test placement before you commit to hanging anything.
Try this: 3M Command Large Picture Hanging Strips, ~$10–$15 for a pack of 12, Target or Amazon
✗ Don’t: use Command strips on textured walls — they don’t adhere properly and your art will fall at 3 a.m.
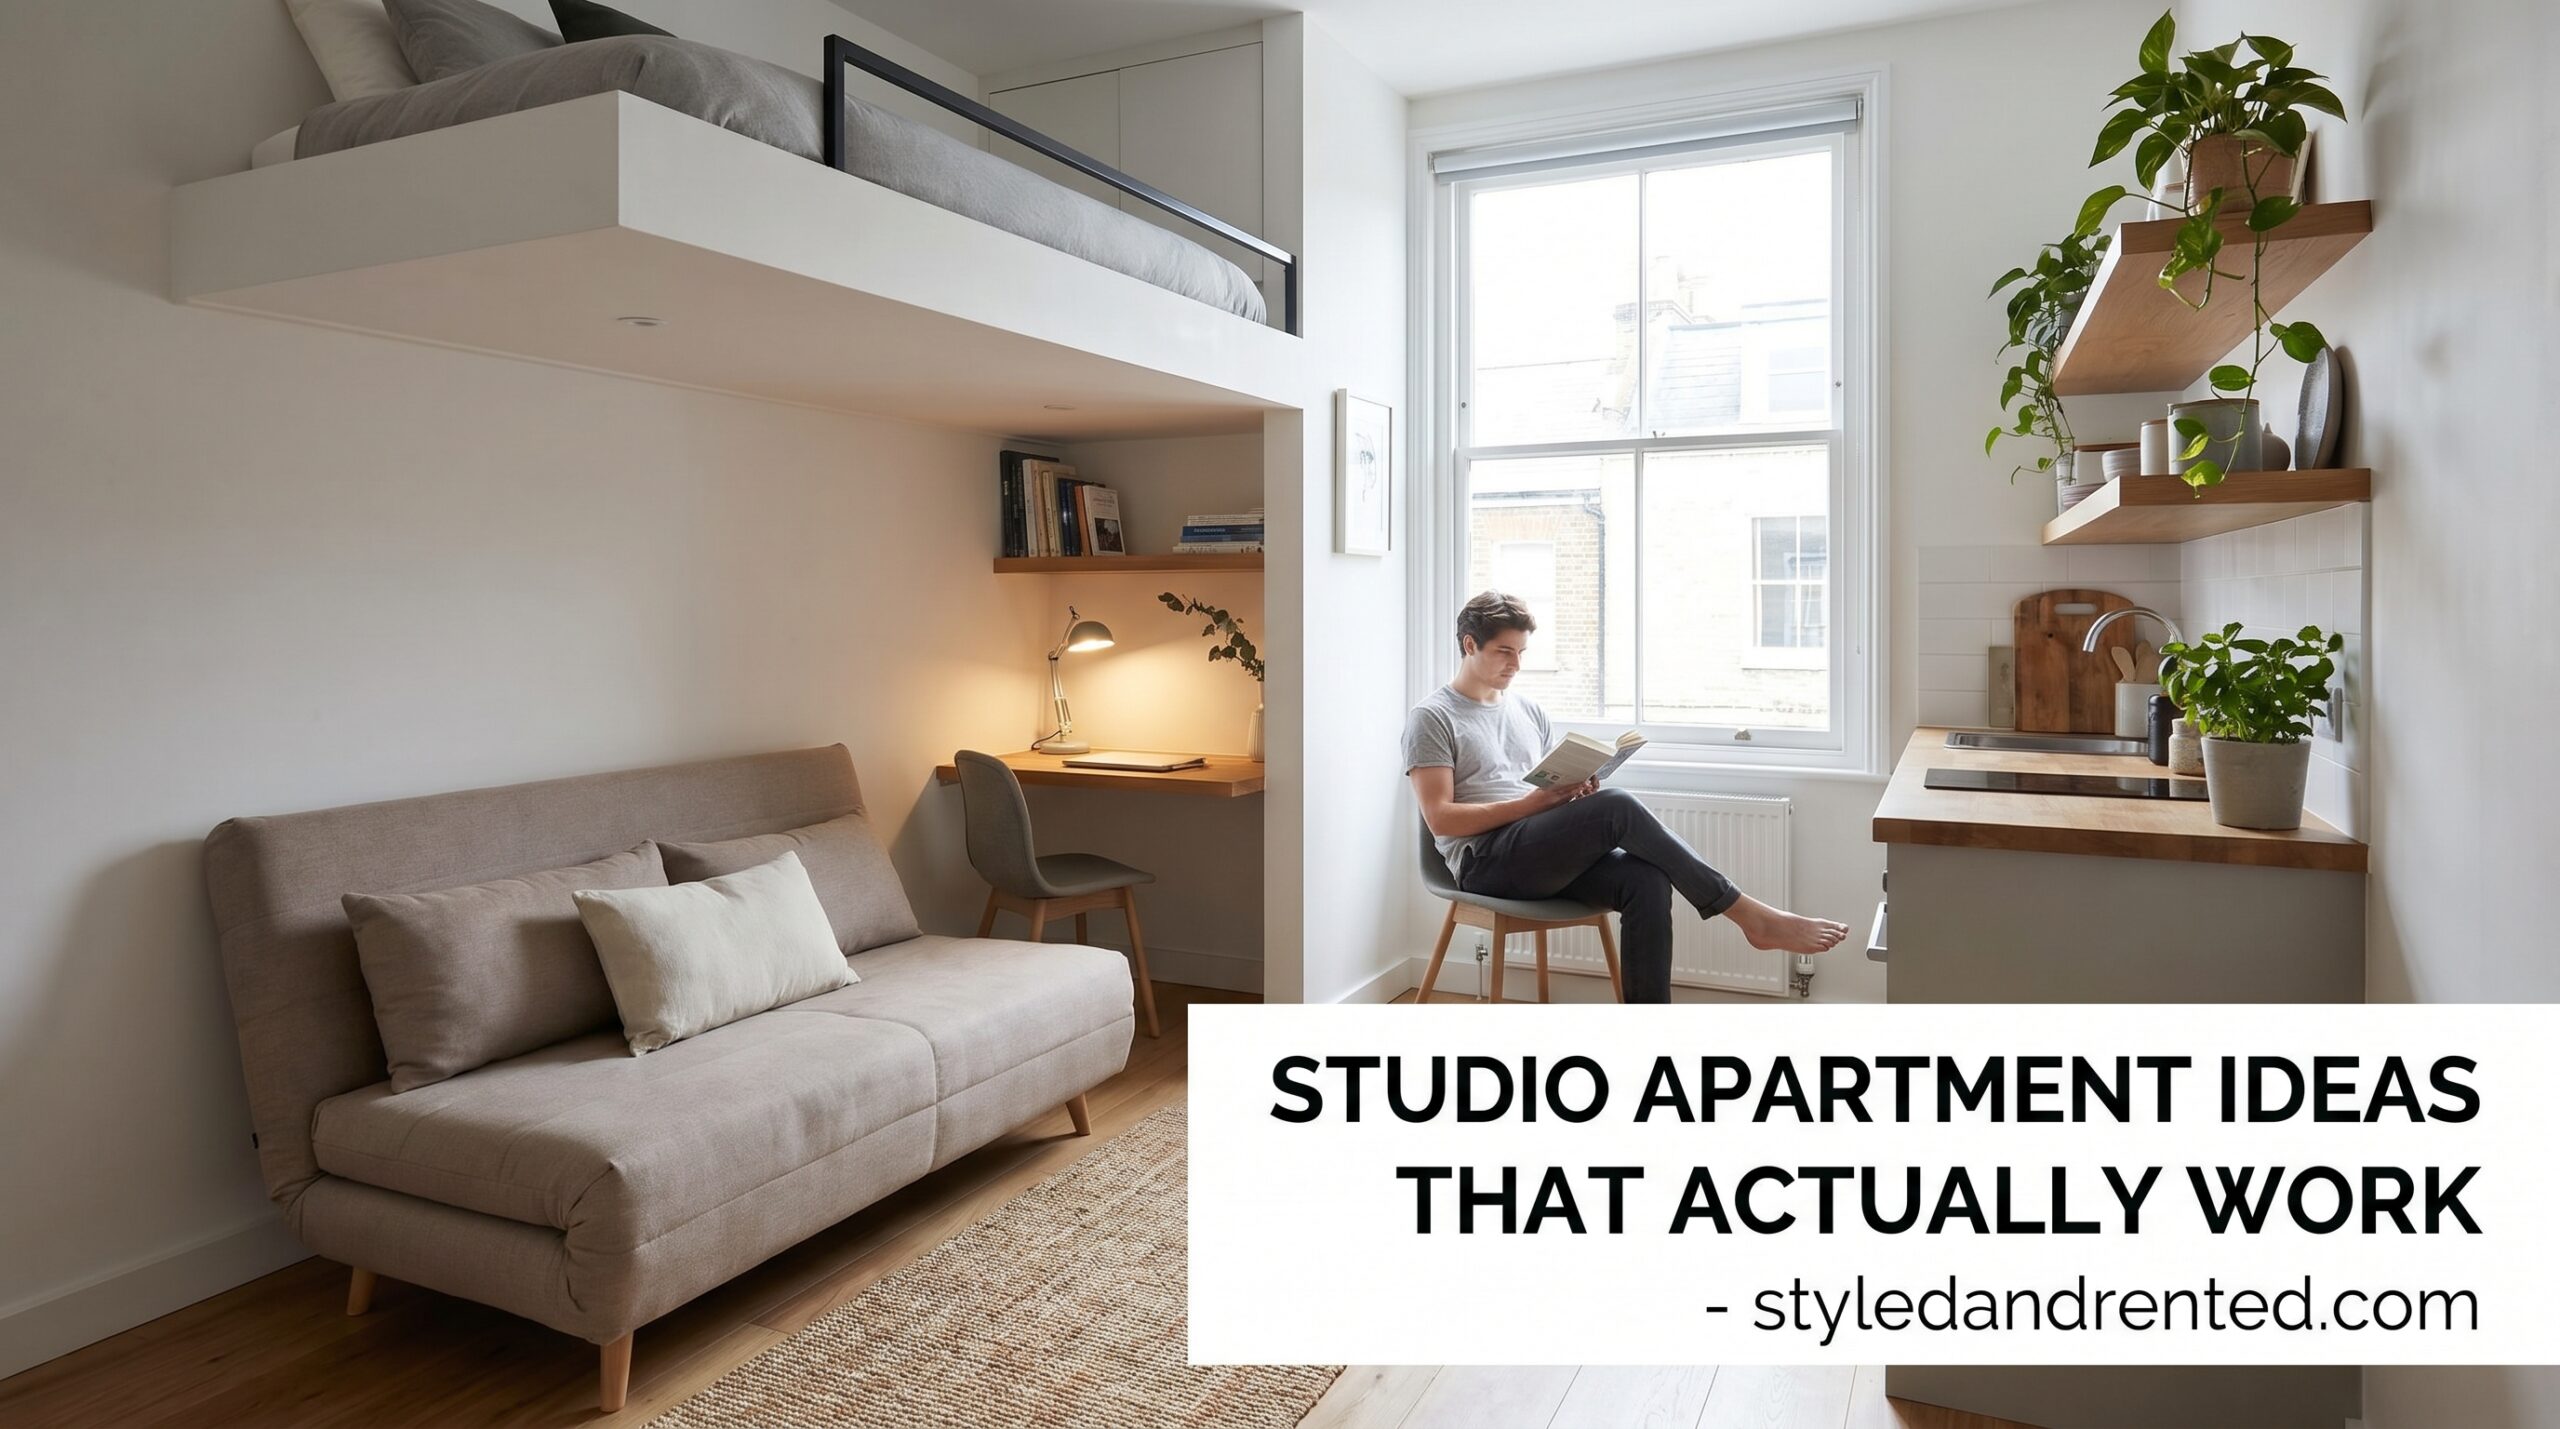
13. Choose a Murphy Bed or Daybed for the Sleeping Zone
If you’re setting up a studio from scratch and your main pain point is the bed eating the entire room, a murphy bed is the most dramatic solution available. A quality wall-mounted murphy bed folds up in 30 seconds and gives you back 40–50 square feet of floor space instantly. Before: your studio is a bedroom with a couch in it. After: it’s a living room that secretly has a bedroom. A well-styled daybed is a more affordable alternative that reads as a sofa by day.
Try this: Wayfair or Murphy Bed Depot wall beds starting at ~$600–$900; IKEA HEMNES daybed at ~$499
✗ Don’t: cheap out on the mattress just because it folds — you’ll sleep on it every night and your back will make you regret it.
14. Use Under-Bed Storage Bins for Seasonal Items
The space under your bed is prime real estate and most people waste it on dust bunnies. Flat, lidded storage bins (look for ones under 7 inches tall to fit standard bed frames) are perfect for off-season clothing, extra bedding, and anything you need access to twice a year rather than twice a week. Vacuum storage bags compress bulky items like winter coats to a fraction of their size.
Try this: IRIS USA flat storage bins with lids, ~$25–$35 for a set, Target or Amazon
✗ Don’t: store anything under there without a lid — it will collect dust and become a black hole of lost socks.
15. Add Removable Wallpaper to One Accent Wall
One patterned wall transforms a plain rental into a space that looks intentional. Removable wallpaper (also called peel-and-stick) has gotten genuinely good in the last few years — the patterns are better, the adhesive is cleaner, and most products come off without damaging paint. Apply it to one wall only, ideally behind the bed or the sofa. A single accent wall adds personality without making the room feel busier.
Try this: Chasing Paper or Spoonflower removable wallpaper, ~$30–$60 per panel, chasing-paper.com
✗ Don’t: wallpaper all four walls in a small space — it will feel like you’re living inside a gift box.
16. Use Tension Rods Inside Cabinets for Extra Storage
A tension rod mounted inside a cabinet — horizontally, about 4 inches from the top — lets you hang spray bottles, cleaning supplies, or even small pots using S-hooks. This keeps the cabinet floor clear and doubles your usable storage without drilling a single hole. This trick is particularly valuable in studio kitchens where under-sink space is the only meaningful storage you have.
Try this: Basic spring tension curtain rods, ~$5–$8 each, any hardware or dollar store
✗ Don’t: overload the rod — tension rods are held in place by friction and will drop everything if pushed past their limit.
17. Define Your Dining Area With a Pendant Light
In a studio, the dining area often exists in theory only — it’s wherever you can balance a plate. A plug-in pendant light hung over a small table or bar cart immediately creates a “room” that didn’t exist before. You don’t need to hardwire anything; plug-in pendants run their cord along the ceiling and wall with adhesive clips. The pool of warm light above a table does more to define a dining zone than any furniture arrangement.
Try this: Industrial plug-in pendant from Wayfair or West Elm, ~$50–$90
✗ Don’t: hang the pendant so low it hits a seated person in the forehead — 30–36 inches above the table surface is the standard.
18. Choose Nesting Tables Instead of a Fixed Side Table
A fixed side table beside your sofa takes up space 24 hours a day even though you use it for about 20 minutes. Nesting tables stack when not in use and expand when you need them — hosting, working from the couch, or doing a puzzle at 11 p.m. because you’ve run out of other coping mechanisms. They’re also easier to move when you want to rearrange, which in a small space you’ll want to do every six months or so.
Try this: Nathan James or HOMFA nesting tables, ~$50–$80 for a set of 2, Amazon
✗ Don’t: get nesting tables in glass if you have pets or a tendency to stub your toe at night.
19. Add a Pegboard in the Kitchen for Tool Storage
Countertop knife blocks, utensil crocks, and appliances are counter space killers. A pegboard mounted to the wall (or hung on adhesive strips if you can’t drill) moves everything vertical. You can arrange hooks and shelves to hold knives, utensils, cutting boards, and small pans. In a studio kitchen, this is less about aesthetics and more about survival.
Try this: IKEA SKÅDIS pegboard system, ~$15–$25, IKEA
✗ Don’t: mount it directly behind your stove — grease will coat everything within a few months and you’ll resent the idea entirely.
20. Use Curtains to Hide an Ugly Closet or Shelving Unit
Open closets and exposed wire shelving are a visual disaster in a small space — everything is on display all the time, which makes the room feel perpetually messy. A simple tension rod and a curtain panel (or two) costs under $30 and hides the chaos entirely. Before: your wardrobe is a constant visual reminder of your laundry situation. After: a clean linen panel that could pass for a built-in wardrobe.
Try this: Linen or velvet curtain panels from Amazon or IKEA, ~$15–$30 per panel
✗ Don’t: use a sheer curtain — it promises privacy and delivers none.
21. Hang Plants From the Ceiling to Use Dead Vertical Space
The upper third of most rooms is completely empty and completely ignored. Hanging plants — macramé hangers, ceiling hooks with trailing pothos or string of pearls — bring life and texture to that dead space without using any floor or shelf real estate. A single hook rated for 15 lbs can support several hanging planters. This is also one of the cheapest ways to make a studio feel lush and intentional.
Try this: Ceiling plant hooks with swivel from Amazon, ~$10–$15 for a pack; pothos cuttings from a local plant shop, ~$5–$10
✗ Don’t: hang plants directly over your bed — you will eventually overwater one and wake up to a very unpleasant situation.
22. Choose a Bench With Storage for Your Entryway
Most studio “entryways” are a 3-foot strip of floor where shoes go to die. A storage bench — even a small one, 30–36 inches long — gives you a place to sit while taking off shoes, storage inside for said shoes, and a visual “landing zone” that makes the entrance feel considered. It also signals to your brain (and guests) that this is a distinct part of the apartment, which helps the whole space feel more organized.
Try this: SONGMICS or Homfa storage bench, ~$60–$80, Amazon
✗ Don’t: use a bench longer than 36 inches in an entry under 4 feet wide — it will block the door swing.
23. Use a Consistent 3-Color Palette Throughout the Whole Space
This one is the force multiplier for every other idea on this list. A studio that uses 12 different colors and wood tones looks like a yard sale — chaotic and small. A studio that commits to 3 colors (say, warm white, natural wood, and one soft green) looks designed, calm, and bigger. Trust me on this one. Pick a neutral base, a secondary tone, and one accent color, then run it through every room — cushions, throws, art, even your kitchen items where possible.
Try this: Spend an hour on Pinterest searching “studio apartment color palette” before you buy a single throw pillow.
✗ Don’t: count “white” as your three colors — you need at least one warm tone or the space will feel like a hospital waiting room.
Now Go Actually Do It
You don’t need to implement all 23 ideas this weekend (though points for ambition if you try). Pick three — ideally one that solves a storage problem, one that affects lighting, and one that creates visual space — and do those first. Small spaces reward iteration. Each change makes the next one easier to see. Start with the rug, or the curtains, or finally mounting that TV you’ve had on a cardboard box since you moved in.
Your apartment doesn’t have to feel like a compromise. It can feel like the place you actually chose to live. For more renter-friendly upgrades that don’t require a drill, check out [INTERNAL LINK: renter-friendly wall decor article]. Now go make your studio work for you.
